this site

Why Nature?

I love nature. Nature is beautiful, peaceful, and soothing. The pleasure of natural green sight, blue skies, smell of the salty sea air, sounds of birds, deep forests, mountains, stars shining with the moonlight, everything just caught my eyes. 
Sometimes I wonder what else in these nature world, other than us, whatelse that we cannot see. What is the history, or secrets hidden in such beautiful places. There may be another realm sharing the same nature with us and live there. I linked the nature with any elements with the story behind it..


Friday, 22 April 2011

Image 3 : [Forest] - Elf

Original photos


The process

Crop the girl using magnetic lasso tool.


Paste on to the forest


Select the wings, can select one of them because it's symmetry 


Place the wing behind the girl, adjust the size.


..and duplicate the wing.


Add mushroom image, and place it below the girl, to make it looks like the girl sitting on the mushroom.


Remove the bracelet and other unnecessary part, including wording on the shirt. This can be done using eraser and stamp clone tool.


Now I want to adjust the background. First, I add some gradient colors above the forest layer.


And I change the blending option.. I also add some glowing effects on the background.


Using a blur tool, I smudge the edge of the wings.. 


Duplicate the wings, adjust the size to make it slightly bigger, and place it behind the smaller wings.


Give some effects on the wings, make them looks transparent.


I add some more sleeves to the girl.. here it looks bit unnatural.. I will clean this part later on.. continue.


Give the girl some hair accessories.. a flowers!


And I add a bunch of flowers around the girl.. 


Now I add some gradient.. to give a rainbow effect..


Adjust the blending and opacity.. For me this is one of the easiest to make a rainbow..


Add some butterflies! ..select the brush from special effect brushes..


Brush the butterflies scattering.. and add some real butterflies.. twist the size, rotate, transform, here and there..


After that.. I enhance the effect by adding a sparkles~


Now time to make up the elf.. Place the ears behind the girl.. adjust the size and placement as needed..
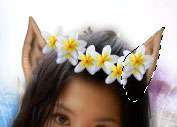

Uhm.. I'm thinking to make her eyes become green.. I add a spot of green brush.. and change the blending option to soft light..


..and add some lipstick :p


Now I place the rabbit on her shoulder.. this elf has a companion! (ps: rabbit is my favorite pet!)


Final Image


Elf

Story of the picture : Thinking about the forest, it sometimes reminds me of the myth of elves. Elves are well known of their beauty and immortal life. They usually live deep in the forest with forever a springtime. That's why the flowers always blooming and colorful butterflies are everywhere enjoying the beauty of the rainbow. This pretty elf can cast an enchantment, and their race has come associated with fairies. She has a rabbit as a companion.. and the rabbit likes sitting up high on her shoulder with a good view. 

image credit : wings | forest | mushroomelf ears | rabbit 

Wednesday, 13 April 2011

Research Paper : Outline

My title:

Digital Storytelling for Education

Outline :
Abstract
Keywords
1.0 Introduction
2.0 What is Digital Storytelling
3.0 Educational Uses of Digital Storytelling
4.0 Process of Digital Storytelling
5.0 Benefits and Overview
6.0 Conclusion
References

Monday, 14 March 2011

My first digital painting

Whoppss.. I think digital painting will be out-of-theme here. So let me just publish it for a side entry. This is my first attempt using photoshop to paint .. amatur job..

Original Image


Final Painting

Have you watch GTO (J-Dorama)? It's one of my favorite series. :)
..and Nanako Matsushina is my favorite actress~ <3

Saturday, 5 March 2011

Image 2 : [Tree] - Seasons

This is an interesting pic to work with. I'm going to combine them into seasons.

Original photo


The Process

First, I split all 4 images. I open one single pic and extend the canvas size to the right, horizontally.


I paste another image on to the empty space, and another 2 images on the top of the other. They are now overlapped. Lower down the opacity to make sure the image is pasted precisely.


Add layer mask for the top images.


And add gradient fill to erase half of the area.


This is the outcome. I do the same thing to another images.


They are now become like this:


Now I edit winter part. I add snow effect and a moon (the same source from previous theme).


For the autumn, I add some sunshine using the combination of brush and lens flare technique.


Spring part, originally is quite plain. So I add some flower effect and adjust the color to make it look more purple-ish.


Finally for summer, I add a plain lens flare, and some highlight on the tree.


Now I exted the bottom part of the canvas. I rearrange both images as I want to make the photo vertical, instead of horizontal (as described in first few images above). 


I do some clean up at the combined area.


This is the final outcome :)


Final Image


Seasons

Story of the picture: From four separated photo I combined them into one image. Rotating as if in one tree, with the tree's reflection. This combination produce four seasons. It shows that in a year, season by season has passed. Weather in each season portrays the memories become faded but they are attached together in between the tree trunk.

image credit : trees  |  moon

Tips & Techniques


- make a rough sketch to throw your idea onto the paper. search for a reference image, but don't simply copy.
- sometimes I start to develop based on what I have in my mind, but it is advisable to write down/sketch to make sure your idea didn't fly away.
- try an error of various tools. Each effects can be made by many techniques. Different user with different style.
- always save a backup file in case you want to undo from earlier than what left in the history steps.
- accept the critism and improve your work constantly.
- it's not advised to use default settings, such as default gradient and blending default color. People will get tired looking at it.
- if you want to place your copyright text or watermark, make sure it didn't 'cover' your image as a whole. Sometimes copyright text distract your viewer from viewing your image.
- make a proper clean up so that viewer cannot 'detect' your #fail in the photo
- up to date with latest techniques by subscribe or follow graphics related website.

Imagination


“When you think something, you think in picture. You don't think a thought in words. You think a picture that expresses your thought. Working with this picture will produce it into your experience.”
- Grace Speare (American Author)

My awesome lecturer

Introducingggg.. Dr Neo Mai
My lecturer for this subject.


Click here to visit
You can also find complete list of other student's blog. (^_^)

Followers

© Fatihah AfH. Powered by Blogger.